I have had my CCNA for a long time now but never really though about the Juniper certification path. With juniper popping up a little more frequently in places of work and NetworkChuck's 30 Day Cert Challenge I decided to step out of Cisco land and get my JNCIA . Here is a quick dump of my study notes that might be helpful if you're heading down the JNCIA path.
With many years of Cisco experience I didn't need to rehash the fundamentals of networking. My goal here was to learn the differences between the two vendors and enough of the Juniper way to pass the exam. If you don't have a background in networking my study notes will fall far short of everything you need to know for the JNCIA exam. Either way, I would highly recommend you review the exam objectives early in your study and again in the lead up to sitting the exam to ensure you haven't missed any topics.
- Platform Architecture
- CLI basics
- Day 0 configuration
- Configurations
- CLI help and documentation
- Interface terminology
- Debugging = Trace
- Filtering CLI and Log output
- Operations and Monitoring
- Routing Policy and Firewall Filters
- Control Plane Protection
- IPv6 and Shortening
- Protocol numbers
- Short Cut keys
- Command Symbols
- User Classes
Platform Architecture
- Routing Engine(RE) - This is the control plane of the device
- Packet Forwarding Engine(PFE) - Is the data plane or forwarding plane of the device
- Physical Interface Card(PIC) - Physical interfaces for the router and are installed in a FPC
- Flexible PIC concentrators(FPC) - Are the line cards and provide packet forwarding services
Juniper systems are based on a Free BSD operating system.
Default route tables
- Default route table is “INET.0”
- Default multicast route table it “INET.1”
Key Processes in the RE
- Management Daemon(MGD) - Responsible for the management and connectivity to the device such as SSH, Telnet
- Device Configuration Daemon(DCD) - Responsible for all configuration of the device
- ChassisD - Responsible for brining online all line cards
- Routing Protocol Daemon(RPD) -
- Key Management Daemon(KMD) - Ike key exchange
A management process running on each line card takes the FIB data pushed down from the RE and translates it into actionable forwarding rules on the card.
99.9% of traffic is ‘transit traffic’. Traffic to the RE is ‘host traffic’
Some ‘host traffic’ is classed as ‘exception Traffic’ and is not punted to the RE for processing instead it’s offloaded to the cards for processing. Traceroute traffic is an example of exception traffic handling
You can attach a firewall filter to Lo0.0 in the IN direction to restrict what traffic can be sent up the the RE. This is where you would enforce what SSH is allowed or who can send OSPF hello messages and so on.
CLI basics
show ospf neighborshow routeshow route forwarding-tableShows a list of routes pushed down to the FPCshow system processes extensiveSame output as the linux top commandstart shellDrops into a unix shell where you can run commands like ls -ls, pwd, df -hstart shell pfe network network fpc0Attaches to management process of the line card
Day 0 configuration
- There is a Console(CON) port and an Auxiliary(AUX) port for day one connection
- The default username and password - root/(No password)
- By default all services are disabled
FXP0 is the name of the management interface. This is brought up before any other interface. You can NOT route traffic from the management interface to a line card or line card to management.
Minimum config for SSH access
1
2
3
4
5
6
7
8
9
10
11
root@:~# cli
root@vMX > configure private
root@vMX # set system root-authentication plain-text-password
New password: Password01!
Retype new password: Password01!
root@vMX # set system services ssh
root@vMX # set system login user matt class super-user
root@vMX # set system login user matt authentication plain-text-password
New password: Password01!
Retype new password: Password01!
root@vMX # set system host-name juniper01
Configurations
Use the command configure private to get your own private copy of the configuration to edit and commit. This will prevent 2 or more people editing the same candidate configuration and prevent a commit being made by someone else before the configuration is completed.
A commit from configure private must be done from the top of the configuration tree.
Configuration Backups
Configurations are all moved to a rollback configuration file. The first 3 are in /config/ and then 4-49 are stored in /var/config/ as this is a larger mount point. Total of 50 files
Configuration Rollback
Use the command rollback 1 to copy the 1st rollback file into the current candidate configuration. Only once you commit that config will it move it to production
You can abort changes with the command rollback 0
Config manipulation
replace pattern /24 with /25String replacement of configuration in the current contextcopy ge-0/0/0 to ge-0/0/1Duplicate configuration from one interface into the the nextannotate interface ge-0/0/0 “message"Add comments above the config itemload merge filenameMerge a config file into the candidate config. Use when the source config file has the top level defined.load merge filename relativeLoad a config file into the candidate where you are in the config hierarchyload override filenameWill replace the existing candidate config. Useful to restore to a known point like resetting a labsave terminalWill output your current context to terminal ready to be paste in.rollback rescueLoad the recovery configurationrequest system configuration rescue saveWrite the current configuration to a permanent configuration file. The files is not rolled like the regular config files. Used to create a safe point to rollback to.
Configuration Compare
You can compare the active configuration to a previously committed configuration by using the following commands:
show configuration | compare revision revision-idshow configuration | compare rollback rollback-number
Similarly in configuration mode, you can compare the candidate configuration to a previously committed configuration by using the following commands:
show | compare revision revision-idshow | compare rollback rollback-number
Default Configurations
- MX - No configuration
- EX/QFX - All ports in a default untagged vlan, RSTP, IGMP Snooping
- SRX - DHCP Client on ge-0/0/0, All port on untagged Vlans, DHCP Server, trust and untrust zone
All device types have the same default configuration for:
- Syslog
- No Root password
- No Telnet or SSH
Factory reset
Factory default a device with request system zeroize to reboot with no configuration and all data and files deleted
load factory-default load a default configuration to candidate. Must add root user before a commit will succeed.
Logging
edit system syslog
All logs are saved in /var/log/ by default
NTP
Configure NTP with:
show system ntp
boot-server 1.1.1.1;
server 1.1.1.1;
The boot-server is checked at boot time and we will consume that time no matter how far our current drift is. If our system time it more than 1000 seconds from the npt server we will not sync.
Configuration Groups
Groups are a style of creating templates to be applied to to part of the configuration.
edit groups
MY_GROUP {
	interfaces {
		<ge-1/*> {
			mtu 8000;
		}
	}
}
apply-groups MY_GROUP;
## or apply-groups [MY_GROUP OTHER_GROUP]
View the applied config show | display inheritance that will also provide a comment of where the configuration comes from
Use show | display inheritance | except ## to reduce the config output as the comments are large
re0 and re1 are reserved configuration group names.
CLI help and documentation
help topic routing-options staticbrings up a man page like documentation for that commandhelp reference routing-options staticbrings up a man page that will describe the syntax of the command- Use of
spaceon the cli will auto complete system words. It will not complete user defined things - Use the word
topto run a command from the top of the configuration tree. show | compareto see a diff with the current running configuration
Interface terminology
- IFD = Name for a physical interface
- IFL = Name of a logical interface on top of a IFD
- IFF = Inet Interface family. v4 and v6 on the same logical
Debugging = Trace
Within the context of where you are in the configuration use:
edit traceoptionsset file my_ospf_traceset flag error detail
A file will be created in /var/log/ with the debug log. View the file with run show log my_ospf_trace
Filtering CLI and Log output
run show log messages | match ospf | match “Aug 25”run show log messaged | count ospfrun monitor start messagesSame as Ciscoterm monrun monitor stopSane as Ciscoterm no monesc+qWill temp enable and disable the monitoring session
Operations and Monitoring
request system haltThis is the recommended process before pulling the power. Gracefully stop processes and protect the system(finish write to disk) before going down and sit there will powered on doing nothing. Will need a reboot to come back up.request system power-offSame as above but will trigger a mechanical off of the power supply if supported on that model
Show interface
show interface terseSame as Ciscoshow int briefshow interface extensiveEquivalent to Ciscoshow intshow interface diagnostics optics ge-0/0/0
Monitor interface
monitor interface interface-nameShows a detailed dynamic output of interface statsshow interface trafficGives a one line per interface dynamic output of interface stats on the boxtraceroute monitor 1.1.1.1Provide a dynamic output of the route path.
Ping and trace route have the parameter routing-instance be VRF aware. But for show commands it will just be instance. Use show route table
Packet Capture
To capture traffic on the routing engine, OSPF, ARP, STP, ICMP, SSH
monitor traffic interface ge0/0/0.0 no-resolve size 1518monitor traffic interface ge0/0/0.0 no-resolve size 1518 detail
Password recovery
Interrupt the boot process by pressing space during kernel boot and use the following process
boot -sBoot into single user moderecoveryThis will execute a built in script to provide enough access to the system to change root passwordconfigureset system root-authentication plain-text-passwordcommitexitexitreboot the system ( y / n ) Y
Routing Policy and Firewall Filters
Routing
Import and export policies are processed top to bottom though a set of terms and processing stops at the first match with an accept or reject action. If the action is only to modify, processing will continue.
When you apply policy you can create a list of policies applied. The order in the list is important. set ospf export [POLICY_ONE POLICY_TWO]
Export policies will apply to all * or active routes in the route table and run them though the policy.
The default at the end of the policy will depend on the protocols RFC standards
Route policy default behavior
- BGP
- Import - Accept all valid BGP route and import to inet.0
- Export - Accept and advertise all active BGP routes
- OSPF
- Import - Accept all OSPF routes into inet0 from the LSDB SPF calculations
- Export - Reject All. The OSPF interface address is still advertised
- IS-IS
- import - Accept all ISIS SPF route into inet0 from the LSDB SPF calculations
- Export - Reject All. The ISIS interface address is still advertised
- RIP
- Import - Accept all valid(hope count < 16) RIP routes from explicitly configured neighbors into inet.0
- Export - Reject everything!
If a term has no from condition it matches everything. Overriding the default
Route Filter Types
- exact -
192.168.0.0/16 exact - longer -
route-filter 192.168.0.0/16 longer- Will include any smaller network in that /16 but not the /16 itself
- orlonger -
route-filter 192.168.0.0/16 orlonger- Will include the /16 and any network inside that /16
- upto -
route-filter 192.168.0.0/16 upto /18- Will include the /16 and any prefix in the /16 with the length of /17 and /18
- range -
route-filter 192.168.0.0/16 prefix-length-range /18 - /19- Will include any network in the /16 that has a /18 or /19
Prefix lists
Prefix lists are a list of exact matches that can be used on a policy.
from{
  prefix-list myList;
}
or used like this to extend the matching criteria od the term with the shortcut
from{
prefix-list-filter myList orlonger reject;
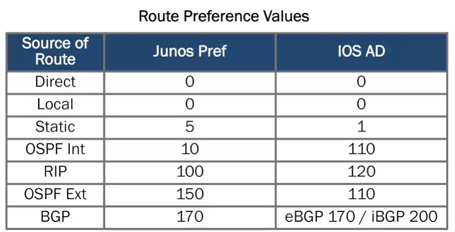
}Route metric - Route Preference
RIB-Groups
Provide the ability to leak routes between routing-instances, 2 RIB-Groups are needed to leak routes, one in both directions
Control Plane Protection
Firewall filters are attached to interface FXP1 but they should not be configured there. Create them under lo0.0 unit 0 which will apply to FXP1
IPv6 and Shortening
Addresses consist of 8 segments of 16 bits, 16 bytes or 128 bits long
- Zero Suppression: Because is it known that all 8 segments consist of 16 bits it is possible to remove any leading zeros from each section without making the address ambiguous.
- Zero Compression: Because it is known that each address must be made up of 8 segments it is possible to compress the first instance of multiple contiguous segments of all zeros without confusing the address. This is only allowed once within a single address.
Protocol numbers
- 1 = ICMPv6
- 6 = TCP
- 17 = UDP
Short Cut keys
- Ctr+a - Moves the cursor to the beginning of the command line
- Ctrl+E - Moved the cursor to the end of the command line
- Ctrl+u - Deletes all characters and negates the current command
- Ctrl+w - Deletes the entire word to the left of the cursor
Command Symbols
>= Operations Mode#= Configuration Mode%= Unix Shell
User Classes
- Super-user - All permissions
- Operator - Clear, network, reset, trace and view permissions
- read-only - View Permissions
- Unauthorized - No Permissions